Elasticsearch is a great document store that employs the powerful Lucene search engine. The ELK stack provides a complete solution for fetching, storing and visualizing all kinds of structured and unstructured data. ELK has been traditionally used for log collection and analysis, but it is also often used for collecting business and application data, such as transactions, user events and more.
At Anodot, we use Elasticsearch to store the metadata describing all of the anomalies our system discovers across all of our customers. We index and query millions of documents every day to alert our customers to and provide visualizations of those anomalies, as an integral part of our anomaly detection solution. Below is a diagram illustrating the Anodot system architecture.
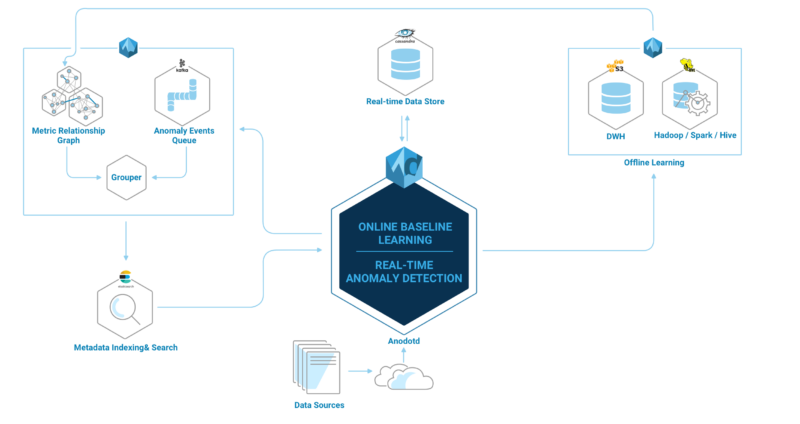
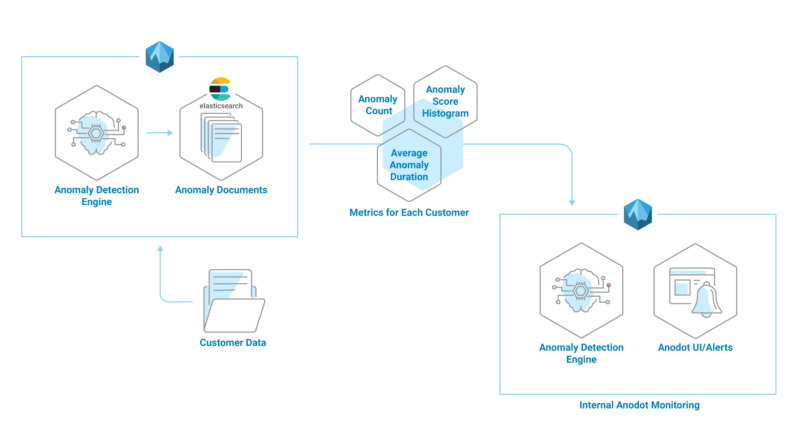
Detecting and investigating issues that are somehow hidden within the huge amount of documents is a difficult task, especially if you don’t know what to look for beforehand. For example, a glitch in one of our own algorithms can lead to a sharp increase (or decrease) in the number of anomalies our system discovers and alerts on for our customers. To minimize the possible damage this kind of a glitch could cause to our customers, we query the data we store in Elasticsearch to create metrics which we then feed into our own anomaly detection system, as seen in the illustration below. This allows us to find anomalies in our own data so we can quickly fix any glitches and keep our system running smoothly for our customers.
Harnessing Elasticsearch for Anomaly Detection
We have found that using our own anomaly detection system to find anomalies, alert in real time and correlate events using data queried from Elasticsearch or other backend systems is ridiculously easy and highly effective, and can be applied to pretty much any data stored in Elasticsearch. Many of our customers have also found it convenient and simple to store data on Elasticsearch and query it for anomaly detection by Anodot, where it is then correlated with data from additional sources like Google Analytics, BigQuery, Redshift and more.
Elasticsearch recently released an anomaly detection solution, which is a basic tool for anyone storing data in Elasticsearch. However, as seen in the diagram above, it is so simple to integrate data from Elasticsearch into Anodot together with all of your other data sources, for the added benefit that Anodot’s robust solution discovers multivariate anomalies, correlating data from multiple sources.
Here is how it works:
Collecting The Documents: Elasticsearch Speaks the Anodot language
The first thing that needs to be done is to transform the Elasticsearch documents to Anodot metrics. This is typically done in two ways:
- Using Elasticsearch Aggregations to pull aggregated statistics including:
-
- Stats aggregation – max, min, count, avg, sum
- Percentile aggregation – 1,5,25,50,75,95,99
- Histogram – custom interval
-
- Fetch “raw” documents right out of Elasticsearch, and build metrics externally using other aggregation tools (either custom or existing tools like statsd).
We found method 1 to be easier and more reasonably priced. By using the built-in Elasticsearch aggregations, we can easily create metrics from the existing documents.
Let’s go through an example of Method A. Here, we see a document indexed in Elasticsearch describing an anomaly:
{
“_index”: “anomaly_XXXXXXXXXXX”,
“_type”: “anomaly_metrics”,
“_id”: “07a858feff280da3164f53e74dd02e93”,
“_score”: 1,
“_ttl”: 264789,
“_timestamp”: 1494874306761,
“value”: 2,
“lastNormalTime”: 1494872700,
“timestamp”: 1494874306,
“correlation”: 0,
“maxBreach”: 0.2710161913271447,
“maxBreachPercentage”: 15.674883128904089,
“startDate”: 1494873960,
“endDate”:,
“state”: “open”,
“score”: 60,
“directionUp”: true,
“peakValue”: 2,
“scoreDetails”: “{“score”:0.6094059750939147,”preTransform”:0.0}”,
“anomalyId”: “deea3f10cdc14040b65ecfc3a120b05b”,
“duration”: 60,
“bookmarks”: [
]
}
The first step is to execute an Elasticsearch query to fetch statistics from an index which includes a “score” and a “state” field, i.e. aggregate the “score” field values to generate several statistics: percentiles, histogram (with 10 bins) and count, for all anomalies where the “state” field is “open” as seen below.
{
“size”: 0,
“query”: {
“bool”: {
“must”: [
{
“term”: {
“state”: “open”
}
}
]
}
},
“aggs”: {
“customer”: {
“terms”: {
“field”: “_index”,
“size”: 1000
},
“aggs”: {
“score_percentiles”: {
“percentiles”: {
“field”: “score”
}
},
“score_stats”: {
“stats”: {
“field”: “score”
}
},
“score_histogram”: {
“histogram”: {
“field”: “score”,
“interval”: 10,
“min_doc_count”: 0
}
}
}
}
}
This would be the response:
{
“took”: 851,
“timed_out”: false,
“_shards”: {
“total”: 5480,
“successful”: 5480,
“failed”: 0
},
“hits”: {
“total”: 271564,
“max_score”: 0,
“hits”: []
},
“aggregations”: {
“customer”: {
“doc_count_error_upper_bound”: 0,
“sum_other_doc_count”: 0,
“buckets”: [
{
“key”: “customer1”,
“doc_count”: 44427,
“score_stats”: {
“count”: 44427,
“min”: 20,
“max”: 99,
“avg”: 45.32088594773449,
“sum”: 2013471
},
“score_histogram”: {
“buckets”: [
{
“key”: 20,
“doc_count”: 10336
},
{
“key”: 30,
“doc_count”: 7736
},
{
“key”: 40,
“doc_count”: 8597
},
{
“key”: 50,
“doc_count”: 8403
},
{
“key”: 60,
“doc_count”: 4688
},
{
“key”: 70,
“doc_count”: 3112
},
{
“key”: 80,
“doc_count”: 1463
},
{
“key”: 90,
“doc_count”: 92
}
]
},
“score_percentiles”: {
“values”: {
“1.0”: 20,
“5.0”: 21,
“25.0”: 30.479651162790702,
“50.0”: 44.17210144927537,
“75.0”: 57.642458100558656,
“95.0”: 76.81333333333328,
“99.0”: 86
}
}
},
Once we receive the Elasticsearch response, we use code like the example below to transform the data into Anodot’s Graphite protocol and submit it to our open source Graphite relay (available for Docker, NPM and others).
Anodot Transforming Code:
#!/usr/bin/env ruby
require ‘graphite-api’@CONNECTION = GraphiteAPI.new(graphite: $graphite_address)
@CONNECTION.metrics({ ” #{base}.target_type=gauge.stat=count.unit=anomaly.what=anomalies_score” => customer[‘score_stats’][‘count’],
” #{base}.target_type=gauge.stat=p95.unit=anomaly.what=anomalies_score” => customer[‘score_percentiles’][‘values’][‘95.0’],
” #{base}.target_type=gauge.stat=p99.unit=anomaly.what=anomalies_score” => customer[‘score_percentiles’][‘values’][‘99.0’]})
Anodot Graphite Protocol:
“what=anomalies_score.customer=customer1.stats=p99”
“what=anomalies_score.customer=customer1.stats=p95”
“what=anomalies_score.customer=customer1.stats=counter”
“what=anomalies_score.customer=customer1.stats=hist10-20”
By applying the method above, it is possible to store an unlimited number of metrics efficiently and at low cost.
Submitting Metrics to Anodot
Anodot’s API requires a simple HTTP POST to the URL: https://api.anodot.com/api/v1/metrics?token=<user’s token>
The actual HTTP request’s body is a simple JSON array of metrics objects in the following format:
[
{
“name”: “<Metric Name>”,
“timestamp”: 1470724487,
“value”: 20.7,
}
]
Since Anodot provides many integration tools to existing systems, in particular the Graphite relay and Statsd, any tool that implements a Graphite Reporter can be used to submit the metrics. This may include a customer code or even the Logstash itself. A scheduled cron job can be set to submit these metrics regularly. For more information on the various ways to submit metrics to Anodot, visit our documentation page.
Detecting and Investigating Anomalies with Anodot
We recently had a misconfiguration of one of the algorithms used for one of our customers that led to a temporary increase in the number of anomalies detected and a decrease in their significance score.
 The issue was detected quickly in our monitoring system, so we were able to deploy a new configuration and restore normal functions before the glitch was noticeable to our customer.
In another case (below), we received an alert that the number of anomalies discovered for a customer increased dramatically in a short period of time.
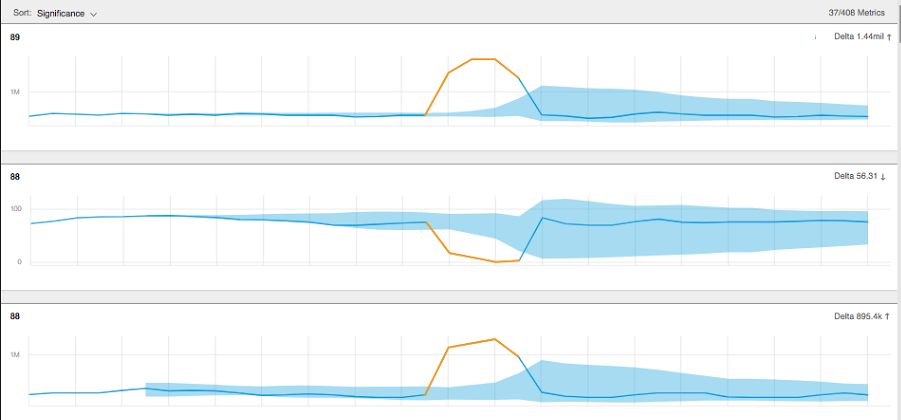
The alert was a positive one for us because this was a new customer in their integration phase, and the alert signaled to us that our system had “learned” their data and had become fully functional. Our customer success team then reached out to initiate training discussions.
Note that the data metrics from Elasticsearch can be correlated within Anodot to metrics from other backend systems. We do this for our own monitoring and real-time BI, and I’ll go into more depth about this in a later post.